Home
DIY
Showing posts with label DIY. Show all posts
DIY Plastic Cauldron To Old & Spooky


Homemade Body Scrub
Where I Party:
Someday Crafts, No Minimalist Here, Sew Much Crafting, I Gotta Create, Seven Alive, Live Laugh Rowe, The Shabby Creek Cottage, Ginger Snap Crafts, Trendy Treehouse, Sew Much Ado, The DIY Dreamer, If It's Not Baroque, Hickory Trail, My Turn For Us, Funky Junk Interiors, Create, Craft, Love, Simply Dream & Create, Suburbs Mama, Raising Memories, Classy Clutter, I Should Be Mopping, Under the Table and Dreaming, Keeping It Simple, Piggy In Polka Dots, Homemaker on a Dime, Alderberry Hill, C.R.A.F.T., Sew Can Do, Crafting My Way to Success, A Peek into My Paradise, Create With Joy, Natasha in Oz, The Gunny Sack, Better With Age, Crafty Confessions, Elizabeth & Co., Katherine's Corner, Lamberts Lately, Uncommon Designs,


DIY ~ No Sew Shirt Embellish
So you are bored with your wardrobe but have no money to go on an insane shopping spree? Well, then let's get creative!
Never be afraid to grab your scissors when it comes to clothing. If a top is too long...cut it. Have a pair of jeans that you don't wear because the knees ripped or your kids' pants fit around their waist but are too short? Make shorts! Have a dress you are bored with? Cut away the bottom half to make a new top. Remember the tank top that I made out of an old t-shirt for the beach?
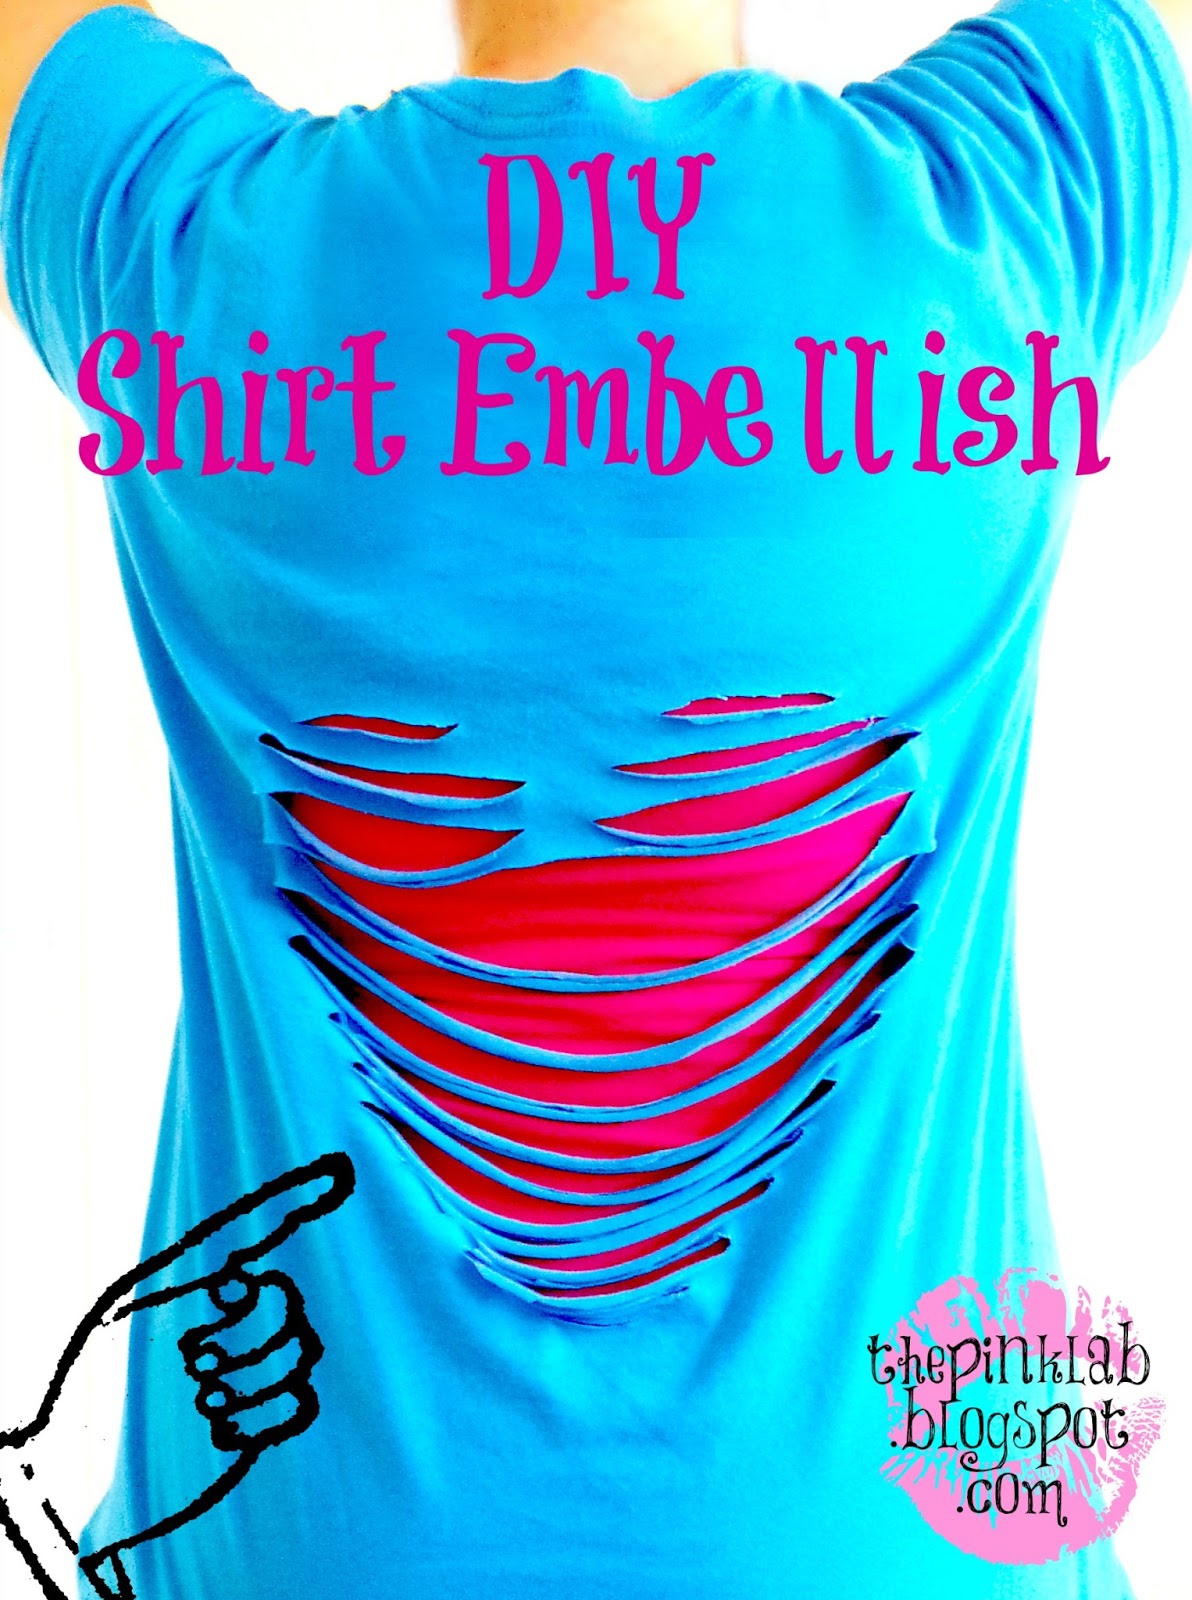
Today I was bored with my same old shirts. Okay, so maybe I'm actually just scissor happy! One of my favorite things to do to my clothing is add a pop of color in some way. So I decided, after much inspiration from Pinterest, to cut a shape in the back of my shirt so a bright undershirt could show through! My undershirt would be my pop...but even cooler is the cut out shape that allows you to see it. I know others have actually glued or sewn material on the inside of the shirt for the pop of color but I want to be able to switch the colors whenever I feel like it.
Here's my easy no sew tutorial for creating a fun embellishment on any shirt using only chalk and scissors!
First you're going to lay your desired shirt inside out on a flat surface. If you need to, iron out any wrinkles. I don't iron but since you're cutting straight lines, you don't want it to end up uneven. (Quick Update: I did this to the 'back' of my shirt but you can do the front if you want to)
Take your chalk and draw your desired "simple" shape. I'm doing a heart. If you are worried about your drawing skills you can always just find a free heart (or other shape) printout online, cut it out, and use it as your guide. Now you want to draw parallel lines inside the heart as shown.
Cut the straight lines only!
Find a fun undershirt or tanktop to wear underneath and show off your crafty awesomeness!!
Where I Party:
Someday Crafts, No Minimalist Here, Sew Much Crafting, I Gotta Create, Seven Alive, Live Laugh Rowe, The Shabby Creek Cottage, Ginger Snap Crafts, Trendy Treehouse, Sew Much Ado, The DIY Dreamer, If It's Not Baroque, Hickory Trail, My Turn For Us, Funky Junk Interiors, Create, Craft, Love, Simply Dream & Create, Suburbs Mama, Raising Memories, Classy Clutter, I Should Be Mopping, Under the Table and Dreaming, Keeping It Simple, Piggy In Polka Dots, Homemaker on a Dime, Alderberry Hill, C.R.A.F.T., Sew Can Do, Crafting My Way to Success, A Peek into My Paradise, Create With Joy, Natasha in Oz, The Gunny Sack, Better With Age, Crafty Confessions, Elizabeth & Co., Katherine's Corner, Lamberts Lately, Uncommon Designs,
Thanks for stopping by to check out this tutorial! Lot's of fun stuff coming up so be sure to stop by each day for some inspiration. :)
Someday Crafts, No Minimalist Here, Sew Much Crafting, I Gotta Create, Seven Alive, Live Laugh Rowe, The Shabby Creek Cottage, Ginger Snap Crafts, Trendy Treehouse, Sew Much Ado, The DIY Dreamer, If It's Not Baroque, Hickory Trail, My Turn For Us, Funky Junk Interiors, Create, Craft, Love, Simply Dream & Create, Suburbs Mama, Raising Memories, Classy Clutter, I Should Be Mopping, Under the Table and Dreaming, Keeping It Simple, Piggy In Polka Dots, Homemaker on a Dime, Alderberry Hill, C.R.A.F.T., Sew Can Do, Crafting My Way to Success, A Peek into My Paradise, Create With Joy, Natasha in Oz, The Gunny Sack, Better With Age, Crafty Confessions, Elizabeth & Co., Katherine's Corner, Lamberts Lately, Uncommon Designs,


DIY: EASY Bow and Arrow
My boys love to use hangers as bows and pretend they are shooting invisible arrows at whatever they are hunting or being chased by. I decided while watching them play that I'd make them "real" lethal weapons to play with!! Then I had a vision of Fat Amy saying, "Mmmm, better not." Then I decided to make them "play" bow and arrows. ;)
Here's what you'll need
1. Old plastic hanger
2. Hand Saw/Or bread knife if you're okay with that
3. Colored Duct Tape
4. Empty Toilet Paper Roll
5. Scissors
6. String
7. Mad Taping Skills
Alrighty. First you're going to cut your hanger in three areas as shown in this image. Set aside the bottom part of the hanger. It will be your arrow later on.
Next, take your empty toilet paper roll and cut a straight line down it's center as shown. Wrap the roll around the center of the upper part of the hanger in the middle. This will be the hand grip. Take your duct tape and use it to cover and attach your roll as shown.
I took a piece of duct tape and folded it to make a pointed arrow piece that I then attached to the end of the bottom piece of the hanger.
The last thing I did was tie the string onto my bow and tape the pieces in place.
Someday Crafts, No Minimalist Here, Sew Much Crafting, I Gotta Create, Seven Alive, Live Laugh Rowe, The Shabby Creek Cottage, Ginger Snap Crafts, Trendy Treehouse, Sew Much Ado, The DIY Dreamer, If It's Not Baroque, Hickory Trail, My Turn For Us, Funky Junk Interiors, Create, Craft, Love, Simply Dream & Create, Suburbs Mama, Raising Memories, Classy Clutter, I Should Be Mopping, Under the Table and Dreaming, Keeping It Simple, Piggy In Polka Dots, Homemaker on a Dime, Alderberry Hill, C.R.A.F.T., Sew Can Do, Crafting My Way to Success, A Peek into My Paradise, Create With Joy, Natasha in Oz, The Gunny Sack, Better With Age, Crafty Confessions, Elizabeth & Co., Katherine's Corner, Lamberts Lately, Uncommon Designs,


Campfire S'mores Without the Campfire
You can make campfire s'mores without going camping, having a campfire, or even a firepit!
Here's what you'll need:
1. Deep baking pans (Size depends on preference. You could even use bread pans if that's all you have)
2. Foil
3. Coals/Wood or Both
4. Old tiles/Bricks
5. S'more essentials :)
Lay down your tiles, rocks, or bricks so that they are flat and stable. This is to provide heat protection between your pans and the surface you're using. I put mine on the grass but you might prefer your cement patio. Next, cover your pans in foil. Then, put coals, wood, or both in your pans. I did both to show two different examples of what could work.
Here's a picture from the side to give you a better idea of how it looked put together. Despite how the picture makes them look, they are extremely stable. I have my tile slabs and bricks placed in such a way that there would be no wiggling or danger of tipping at all.
Use extreme caution when starting your fires. Make sure children have constant supervision around your pans. I might even go as far as putting a rock border around your pans so that they know how far away they should be. Safety first!
Here's what mine looked like after setting up and in use. So easy and the s'mores were delicious!!!
Where I Party:
Someday Crafts, No Minimalist Here, Sew Much Crafting, I Gotta Create, Seven Alive, Live Laugh Rowe, The Shabby Creek Cottage, Ginger Snap Crafts, Trendy Treehouse, Sew Much Ado, The DIY Dreamer, If It's Not Baroque, Hickory Trail, My Turn For Us, Funky Junk Interiors, Create, Craft, Love, Simply Dream & Create, Suburbs Mama, Raising Memories, Classy Clutter, I Should Be Mopping, Under the Table and Dreaming, Keeping It Simple, Piggy In Polka Dots, Homemaker on a Dime, Alderberry Hill, C.R.A.F.T., Sew Can Do, Crafting My Way to Success, A Peek into My Paradise, Create With Joy, Natasha in Oz, The Gunny Sack, Better With Age, Crafty Confessions, Elizabeth & Co., Katherine's Corner, Lamberts Lately, Uncommon Designs
DIY Short Sleeve Shirt To Tanktop


Where I Party:
Someday Crafts, No Minimalist Here, Sew Much Crafting, I Gotta Create, Seven Alive, Live Laugh Rowe, The Shabby Creek Cottage, Ginger Snap Crafts, Trendy Treehouse, Sew Much Ado, The DIY Dreamer, If It's Not Baroque, Hickory Trail, My Turn For Us, Funky Junk Interiors, Create, Craft, Love, Simply Dream & Create, Suburbs Mama, Raising Memories, Classy Clutter, I Should Be Mopping, Under the Table and Dreaming, Keeping It Simple, Piggy In Polka Dots, Homemaker on a Dime, Alderberry Hill, C.R.A.F.T., Sew Can Do, Crafting My Way to Success, A Peek into My Paradise, Create With Joy, Natasha in Oz, The Gunny Sack, Better With Age, Crafty Confessions, Elizabeth & Co., Katherine's Corner, Lamberts Lately, Uncommon Designs
Fourth Of July Tablescape
Red, white, and blue!
Bottled Cream Soda


Where I Party:
Someday Crafts, No Minimalist Here, Sew Much Crafting, I Gotta Create, Seven Alive, Live Laugh Rowe, The Shabby Creek Cottage, Ginger Snap Crafts, Trendy Treehouse, Sew Much Ado, The DIY Dreamer, If It's Not Baroque, Hickory Trail, My Turn For Us, Funky Junk Interiors, Create, Craft, Love, Simply Dream & Create, Suburbs Mama, Raising Memories, Classy Clutter, I Should Be Mopping, Under the Table and Dreaming, Keeping It Simple, Piggy In Polka Dots, Homemaker on a Dime, Alderberry Hill, C.R.A.F.T., Sew Can Do, Crafting My Way to Success, A Peek into My Paradise, Create With Joy, Natasha in Oz, The Gunny Sack, Better With Age, Crafty Confessions, Elizabeth & Co., Katherine's Corner, Lamberts Lately, Uncommon Designs,
Subscribe to:
Posts
(
Atom
)